Previously on "Becca makes stuff", we saw Miss Becca ripping her hair out--sorry, ripping her SEAMS out because she bought cheap lining fabric and had to do THE WHOLE LINING OVER. But all is well in the corset world because now everything is lined up and pinned and (mostly) boned. (again with that word - we're all adults, right?)
 |
| A quick detour. |
 |
| Myrtle Wilson is trash(y). |
It was time to begin to finish this thing. However, I had to take a quick detour for another project - I FINALLY found a great Myrtle dress to use in The Great Gatsby; she needed something period but casual to wear in a quick scene before her "fancy" dress. I found a GREAT blue dress at Goodwill for like $4...but again with the quick changes. I didn't wanna risk this getting pulled over my head and messing up my wig (this change was REALLY fast -- I needed a quick out) so I cut the back open and added a quick zipper. Only took me an hour or so - zippers aren't THAT hard if it doesn't need to look perfect.
Yay! All done and my awesome brother-friend Tyler was a ROCKSTAR getting me into costume lightning-fast every night! Now: back to Belle.
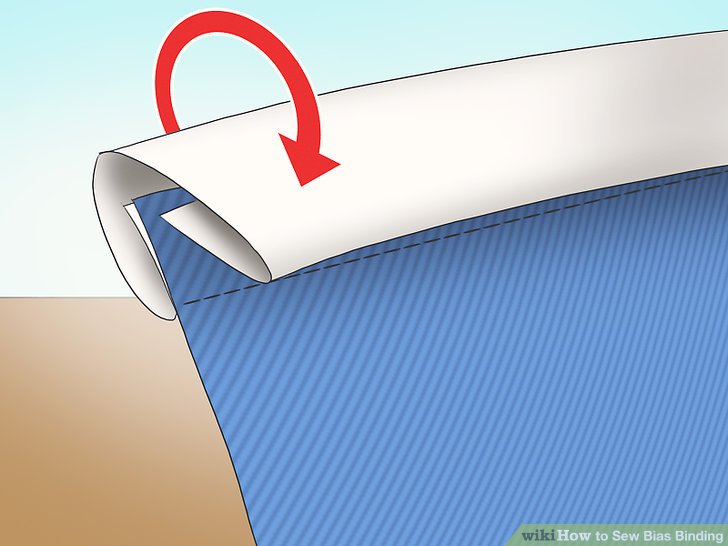 |
| This is how bias tape works...you can buy it pre-folded but you have to fold it yourself if you want to use the same fabric. |
Let's go back to our bias tape. I adore the way bias tape looks; it all folds up nice and neat around the raw edges of your fabric to kind of tuck everything in. As I mentioned before, it's basically a long strip of fabric that has the raw edges folded in, and then the entire thing is folded in half (double fold bias tape). You basically completely unfold it, line it up on the outside of your garment (the side that will show), and sew the front edge on, then you fold it back around the line you just sewed and sew the back side (or the inside of your garment.) If you don't want any of your seams to show, you have to hand-sew your final tuck...which is what I did, because why not; I had loads of time and nothing else to make...(sense the sarcasm...)
 |
| My armpit bias tape was much wider than my neckline...I was running out of fabric. Also you can see my extra shoulder patch here. |
 |
| (You can see on the fabric underneath how I pressed the piping seams open but they didn't stay very well.) |
It actually wasn't too bad, because I had a decent amount of downtime during Gatsby. I could bring my hand sewing and work on it in between scenes. I decided to start with the inside edges of my center-back pieces. That way I could insert the steel boning back there and (hopefully) go ahead and put in the eyelets so I could lace up the back.
 |
| I know I said center back but this is an example of the center front... |
So I went ahead and sewed the bias tape binding onto center back pieces. I figured I would use another piece to bind the top and bottom edges (I couldn't fold the top edges over because I needed to insert boning), so I just cut strips a little longer than my length. I sewed the outside "side", folded the bias tape around my edges and pinned on the inside "side". I used kind of a mix between a whip stitch and a blind stitch to hand stitch the inside edge of the bias tape. Basically I stitched through only the back two layers and took little tiny stitches so that you wouldn't really see the thread on the back (or at all on the front.) I inserted my final two bones to complete the center back pieces.
I pinned all the sections together and tried to fit the whole thing one more time...I think everything was looking ok-enough? I knew the zippered side could/would modify the final fit (I could take a tuck in the side or add fabric if it was too big/small), so I went ahead and continued with my bias-tape edges around the front center edges, as well as the neckline. I left the bottom edge raw for now (the bottom edge would have to be fit with the zipper, but the top edge/neckline doesn't touch the side zipper, so I went ahead and sewed that in.)
(Note: I am writing like this all happened in a couple of days but truthfully this piece took several weeks to make. I brought it to Gatsby performances and hand sewed little by little until the bias tape was done.)
 |
| I can't remember which of these colors I picked... |
Now that I had some finished edges, I went ahead and took a trip to Joann to find some eyelets. Eyelets are the little metal holes that you basically hammer into a garment and it creates loops for lacing something up. They make them one-part or two-part. I wasn't sure what I'd need because while this was technically a "corset", it would only be laced snug to my body, and wasn't meant to be laced incredibly tightly like a real corset. So maybe they didn't necessarily have to be super heavy-duty? I knew I'd need some on both sides of the front and back...and they came in two-part packs of 15 for $5. Or...they also had some one-piece eyelets for WAY cheaper. I wasn't sure how many I would do down the line of the piece, so I bought one pack of both. If the smaller/weaker ones were fine, I'd use those and save a little money. But...I was sick of going to stores and didn't wanna have to go back in case. I also picked up some lacing rope/string. (I actually had to go to several stores to find this in a close-enough color -- you'd be surprised by the difference in stock at all the different Joann stores...I could only find SUPER bright blue at first (I really wanted navy) but I eventually found it at giant Joann on Dobson/202. Estimated how much I'd need and I was ready to head home for more work. (I used a LOT of Joann coupons throughout the course of this...)
 |
| These are great - 2 (technically 3) part eyelets. The kit comes with a little press to hammer onto. |
I tested one of the cheap crap eyelets on a test swatch of fabric. Basically you cut a tiny hole in your fabric (THIS IS INCREDIBLY SCARY ON A PIECE YOU HAVE SPENT WEEKS MAKING) and you insert the teeth of the eyelet into the hole and hammer the back down to press the teeth around the fabric nicely. Well, the cheap crap eyelets were cheap and crap and they crumpled the moment I touched them. So...back to the drawing board. I guess I was spending like $20 on eyelets...I tested one of these two-sided versions on my test fabric and it did WAY better. This one had a front or "right-side" piece with teeth; you push the teeth through to the back, and then you loop a washer and a back metal piece on the back, then you hammer it down and the teeth loop around the back washer. So...I learned these were way better. (Also I chose a muted brass color to blend in better with my fabric, vs bright silver or gold.)
 |
| So. Many. Eyelets. (You can see they are TOTALLY not perfect.) |
So...we began the terrifying process of cutting holes in my beautiful corset. I decided on 12 eyelets for each side, so I measured and marked dots where I wanted to place each eyelet. I finally took the plunge and started cutting. I did NOT want these to fall out or break while I tossed this thing around onstage, so I hammered those eyelets in within an inch of their life...while hopefully still looking nice. This took quite a bit of time, so let's fast forward until all 24 had been set. I was finally able to pull the laces through the back side and connect these two pieces!
 |
| One side is laced!! |
 |
| This thing is actually starting to look decent! |
 |
| Zipper is pinned! |
I figured it was time to finally fit the silly old zipper. Unfortunately I had a heck of a time finding a 7" separating navy blue zipper. They just don't exist in stores, apparently. I needed it to separate, because...well otherwise, what good was it? Unfortunately most separating zippers are only made for jackets etc. So I decided I would get some zipper stops (this is a thing) and buy a longer zipper and just cut it and pin in place. So I got a really heavy duty strong 12" navy separating zipper and used pliers to remove the existing zipper stops. (The little metal pieces at the top of each side of the zipper that keep the zipper from running right out the top. I measured and cut it and then pried the stops back into place (which really wasn't terribly difficult, I just had to be careful not to break them with the pliers. They don't sell a lot of replacements...but now my zipper was sturdy and the right length and ready to go! With the front section pinned together, I wrapped the whole thing around me and pinned the zipper in place. I hesitated sewing it just yet (JUST in case things went awry once I did the corset lacing for the front. I fit it as well as I could, folded everything/hid all the seams, and stuck a lot of pins in it, so when it fit, I'd just have to sew two seams down each side of the zipper.
 |
| Totally #nofilter #itsbluedahbahdee |
Because of the timing; (I think it was showtime by now), I brought my lace and ribbon to Gatsby that day, it was time to hand-sew the lace trim onto the neckline of this thing. I pulled a navy satin ribbon through a piece of decorative lace (It looked super cute when it was all weaved in like that), and pinned to the very top of my piece. Because of how wide the lace was, I decided to sew on both side of the ribbon and give it two strong seams to hold to...unfortunately because of the boning, I couldn't stick the whole thing through my machine. I also used white thread and didn't want it to show through to the other side. So...I did this all by hand. Which took forever but I had time. It was kind of a soothing repetitive project that filled some of my downtime during the show.
With the lace trim set in place (it took some effort to fold and sew the edges down; I wanted them to basically meet in the center seams but because it was two separate pieces I had to fold the ends down to get a clean seam), ALL I HAVE LEFT IS THE FINAL BATCH OF EYELETS!
 |
| I also hand sewed these modesty panels in the front and back. |
 |
| ONLY EYELETS LEFT! (I really didn't put a bunch of filters on these photos. They were just super dark so I tried to lighten them.) |
Time to rinse and repeat the eyelets for the other side. Because of how many eyelets were in a pack, I decided to use only 10-11 (I can't remember) for the front side because I didn't want to buy a whole other box. Some hammering and pounding later....we have a totally laced corset vest! I had to use fray-guard for the ends if the lacing because they immediately started to unravel. I didn't want the lacing bows to show (I would just tuck them inside the piece) and I DEFINITELY didn't want them to unravel, so fray-guard was necessary.
 |
The perfect cotton petticoat
for napkin can-canning!
|
At some point in the middle of this project (and amidst my several hundred trips to Goodwill) I found a GREAT cotton petticoat at one of the Goodwills (Halloween stuff was finally coming out!) but unfortunately it was floor length. I didn't want to spend a whole bunch of money buying a petticoat for the dress online, and frankly I didn't need one more thing to make. So I bought this one for 7.99 and decided I would just take it up to become a knee-length petticoat. I hung it on my mannequin to create a pseudo-bottom for this outfit, and pinned it up for looks.
FINALLY sewed the zipper in (this really didn't take long), finished the bottom edge of the bias tape, tried it on AND IT FIT!!! Honestly this is the best part...when you work your butt off to make something to fit you and it actually fits! and it was CUTE! I am DONE with this thing!!
 |
| With my cute cute $8 petticoat |
 |
| A closeup |
One piece down, ONLY A ZILLION TO GO!!!
No comments:
Post a Comment